Google Ads Conversion Tracking Tutorial
In the past 6 months (Since the iOS update was released), we marketers have been pulling our hair out set up accurate Google Ads Conversion Tracking!
Conversions not tracking properly!
Traffic costs skyrocketing!
ROAS Plummeting.
Decision making… Impossible.
We have all experienced this, and while it’s settling down now, it’s vital that you set up your tracking correctly, so you can cull campaigns/ ad groups/ ads that aren’t working quickly and decisively.
Protecting you from wasting money AND wasting precious time!
Data is king!
So without further ado, here’s how we’ve managed to navigate the iOS changes and how we set up our google ads conversion tracking…
Google Analytics Tag in GTM
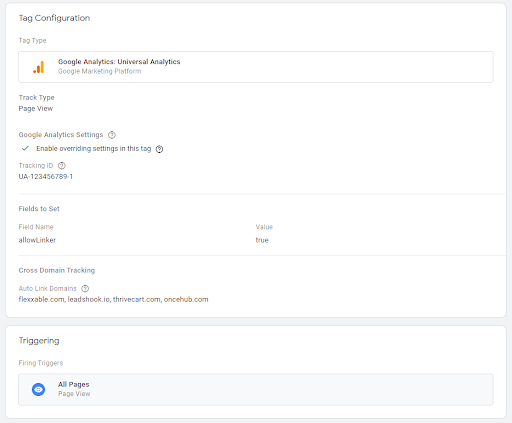
So first things first. To ensure no data is lost throughout the funnel it’s important to enable cross-domain linking within your Google Analytics Tag in GTM.
- Go to your Google Tag Manager Container.
- Go to the tag section and select “NEW”.
- Set “Tag Type” to “Google Analytics: Universal Analytics”
- Track Type “Page View”
- Tick “Enable Overriding Settings in this tag” & ad your tracking ID from Google Analytics (E.g. UA-123456789-1)
- Select “more settings” and amend “Fields to set”
- Put “allowLinker” as the field name and set “Value” to “true”
- Scroll down and select “cross-domain tracking” and add the domains that will be sending data to google analytics within your funnel.
- E.g. we added the following – flexxable.com, leadshook.io, thrivecart.com, oncehub.com
- Then set the trigger to “All Pages” and save.
This is what your tag should look like when you go back into the tag –
This is your first wall of defence. It won’t completely save you from your tracking issues, but it’s certainly a piece of the puzzle that needs to be slotted in.
The next piece is setting up Offline Conversions…
Google Offline Conversion Tracking
The way we set up our offline conversion is the simplest way we know how to do it. It involves pinging data into a google sheet from your form/quiz and then scheduling an upload in google every 24 hours.
There are other ways to do this, but we find this is the easiest way for most people who may be aren’t as tech-savvy and is the way we do it inside our agency.
It’s worth remembering Googles conversions should all be visible inside your account after a maximum of 4 days.
Offline conversions help bring the conversions into your google account much quicker so you can make decisions on ads etc much quicker, and save wasted as spend.
Here’s how to set up Google Offline Conversions,
- Firstly you’ll want to download the Google Ads Conversion Tracking Template which can be found here (Make a copy of this google sheet and use that one).
- Whatever form builder or quiz you are using to capture their data, you’ll need to add 3 hidden fields (gclid, wbraid, gbraid). This is shown at 1.43 of the video. It goes through how to do it with Unbounce and Leadshook.
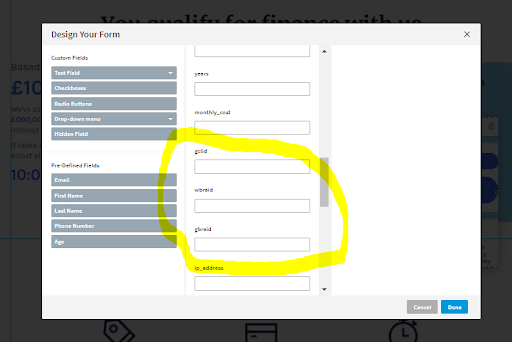
- Then put a test lead through. Ensure that there is a value for the gclid, wbraid & the braid in the URL. (e.g. learn.flexxable.com/free-training?gclid=afbeqb&wbraid=fbebrgre&gbraid=dnbsnsfn) [If you have a real gclid that would be helpful to check the conversion works later)
- Then follow the process to create a zap at 6.10 of the tutorial video.
- Ensure you have the trigger as a form fill or quiz completion.
- Format the time to the same as the example lead in the google sheet template you downloaded earlier (2021-07-27 14:07:18 +0100)
- Then create a row in your Google Ads Conversion Tracking Sheet.
- Next up you need to create the conversion within Google Adwords.
- In the tutorial video skip to 13.00 to see how to do this.
- Set up the new conversion as “Import” ad select “Other data sources or CRMs” and then select “track conversions from clicks”.
- Enter conversion name (has to be the exact same as what is populating in your google sheet).
- Input your conversion value.
- Select count as “One”.
- Set Click-Through Conversion Window as “1 Week”
- Include in Conversions should be set to “Yes”
- Attribution model should be “Time Decay” or “Last click”.
- Then Create.
- Under “Conversion Actions” select uploads and then go to “Schedules”.
- Click the big blue “+” button and select source as “Google Sheet”.
- Then click “Link an existing Google Sheet”.
- Select the sheet you made a copy of.
- Copy and paste the email address google tells you to share the sheet with (should be something like [email protected]) and ensure you share the sheet with it.
- Select frequency as “Every 24 Hours” and select whatever upload time you want (we usually do 11 PM).
- Click “Save & Preview”
- If you have a real gclid in the sheet, there should be a success notification. If it’s a fake one, you will have to wait until you have a real one to test properly.
Once this is set up, you will have two conversion events that you can constantly check against each other to see if you are getting accurate results.
N.B. At the time of writing, Wbraids & Braids aren’t compatible.

Setting Up Google Ads Conversion Tracking in Google Analytics
Google Analytics Universal
If you are using Google Analytics Universal then you need to do the following –
- Go to your Analytics Dashboard.
- Click “Admin” in the bottom left-hand corner.
- In the third column, select “Goals”.

- Click “+New Goal” and select the relevant type of conversion. We usually select custom.
- Name your goal and select your Goal Slot.
- Then select the type of goal it is. We usually use the destination option. Then press continue.
- Ensure to change the destination to “regular expression” and then add your unique URL identifier (i.e. thank-you).
- Add a value for your conversion and you can then add a “funnel” but that’s not necessary at this point.
- Then press “verify this goal” (If you’ve already had traffic to your site with the GA tag on it) and this will tell you if it’s been set up properly.
- Then press save.
Google Analytics 4
If you are using Google Analytics 4, then set up your conversion like this…
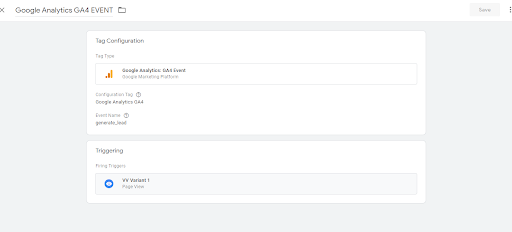
- Go to Google Tag Manager.
- Click “New” in the tag section and then select “Google Analytics: GA4 Event” as your tag type.
- Set “Configuration Tag” as “Google Analytics GA4”.
- Then Set your event name as what you like but try and use their recommended event names. We use “generate_lead”.
- Then set your trigger for the respective page.
- Save
- Then submit.
Micro Conversions
A vital part of lead generation is getting as much data as possible. In google we LOVE setting up micro-conversions at every step of the funnel, so you have full visibility of where the holes in the funnel are.
We have got a video on how to easily set these up, quickly, which you can check out below…
If you would like to create a full training on micro conversions, please comment “Micro” in the Youtube comments on the video and we will see if the demand is there.
Want access to our other webinars?
Go check out our Flexxable YouTube channel…
All you need to grow your PPL lead gen agency