The Facebook Conversion API
With the introduction of iOS 14, the Facebook Conversion API has become a must-have!
Before you could have gotten away with just having browser events for your tracking, but iOS 14 has dropped a huge proverbial dump on the accuracy of this tracking method.
Why?
Because Apple is hiding the cookie data of those who opt-out of tracking on iPhones which means the Facebook Pixel will not know if they convert or not.
So our students and I have seen huge discrepancies in the number of conversions we are seeing.
The Facebook Conversion API can really help with this because:
- Events are only sent to FB once they convert (Server-Side Events)
- These are much more accurate than browser events
- Works with browser events to ensure the best accuracy possible
Therefore we have created a definitive guide to setting up the Facebook Conversion API, so you can implement it easily in your agency WITHOUT the need for a developer.
We use a quiz software called Leadshook that is epic, and the Facebook Conversion API works seamlessly with it, thanks to the help of its founder Nik Thakorlal.
So let’s get into it…
First things first…
What to do inside Facebook?
You first need to get all the information you will need to create the API inside Leadshook.
- Pixel ID
- API Token
- Name of conversion
To find these –
- Pixel ID – Go to “Business Settings” > “Data sources” > “Pixels” > Select your pixel > Click on the “ID” to copy to clipboard > Add to your notepad.
2. API Token – Go to “Events Manager” > “Data Sources” > Select your pixel > Click “Settings” > Scroll down to “Conversions API” > Click “Generate Access Token” > Copy and save to your note pad.

- Usually, you would select the normal Facebook standard “Lead” and we have done this in this tutorial
That’s the Facebook stuff out the way. Now for the tech-heavy stuff… 😭
But fear not! I will walk you through step-by-step on how to set this up.
The guys over at Leadshook have produced comprehensive Facebook Conversion API training, and have really gone the extra mile to help marketers utilise The Facebook Conversion API to the best of their ability.
Setting up the Conversion API inside Leadshook
So, obviously, first, you will need a Leadshook account to be able to utilise this. If you don’t have one you can create one by clicking here.
Once you are in the account let’s get at it!!!!
- Download our template decision tree here and upload it into your Leadshook account.
- Look through it. It should have 6 nodes.
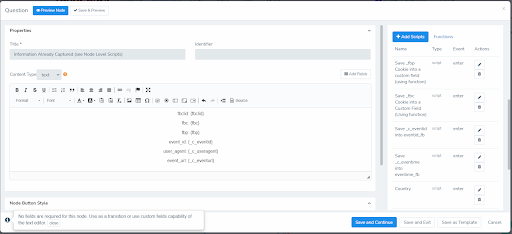
- Click on the first node. This will show up the Facebook-specific parameters that will be needed for the Facebook Conversion API to work. Leadshook has created special functions to capture cookies etc inside their system to use for the Facebook Conversion API.
- There are 7 scripts added to this node. They are to save the “FBC” & the “FBP” cookies and to save the event ID & event time to specific custom fields within Leadshook. Also, the other three save Country, City & Postcode to custom fields so you have that data also.
- If you’d like to know the tech information behind these functions then you can check out the Leadshook tutorial which you can find here.
- The next two nodes capture the name and contact details like usual (You can add any questions you want here like you would normally do.)
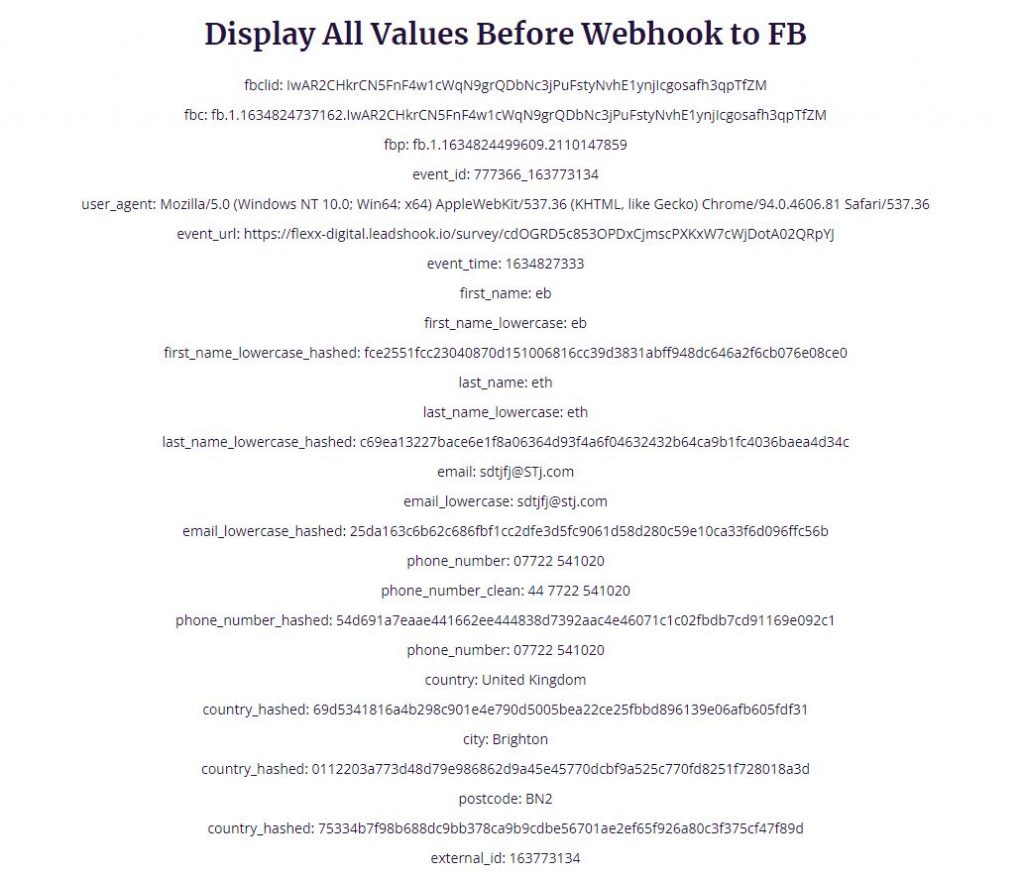
- Then in the next node, you want to ensure all the values you are going to need are displayed before sending the data to Facebook, so you know everything is working correctly and you can troubleshoot the data.
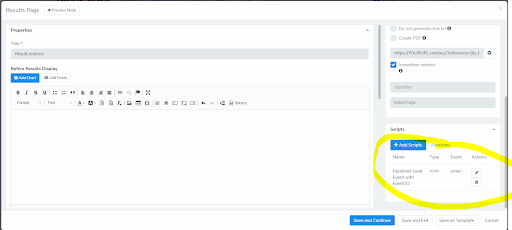
- The Facebook Conversion API node is next! This is the big one…..
The Facebook Conversion API Node
You should have all the data in there and will only need to change the parts that I’ve marked with “**”.
So just in case, it’s not clear, the parts you need to amend are as follows…
- Pixel ID in the “Request URL” (In your notepad)
- Access Token in the “Request URL” (In your notepad)
- Event Name if you are using something different to “Lead”. If you are using “Lead”, keep that the same”
- Currency in “custom_data”. (should be the currency your Facebook account is in)
- Value in “custom_data”. (should be the value of the lead to your business)
- Content name in “custom_data”. (should be your own name for the conversion i.e (VSLOptin)
- Content Category in “custom_data”. (should be the category your conversion lands in. We just use our name i.e. Flexxable)
- Content IDs in “custom_data”. (should be your ID for the conversion i.e. “FLX002”
- Test Code at the button of the script.
- Finally, I would double-check that all the custom fields in “User_data” are the same as the ones you have used in your form. These match our custom fields and may differ to yours, so it’s important to check.
- Once this is done press “Save & Exit”.
- Then on the Redirect node, you want to add your Thank You page URL and double-check the “Browser” lead event script.
- You want to add your “Content Name”, “Content Category”, “Value” and “Currency”. They must match the ones in your Facebook Conversion API.
- It’s also important to have the Event ID & the External ID, so the Facebook Conversion API can recognise duplicates.
Next up, testing!…
How To Test the API
So, to test the Facebook Conversion API, you will first need to get the Test code as mentioned above.
To do this you will need to do the following…
- Go to “Event Manager” > “Data Sources” > Select your pixel > Click on “Test Events” > Click on your Test Code to copy to clipboard
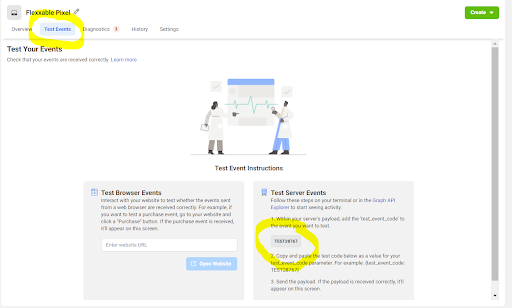
- Then go back you the Facebook Conversions API node and add in the test code where it says “test_event_code”: “**TestCode**”.
It should now all be ready to test.
To test the Facebook Conversion API you will need a “fbclid”, so first go to browser settings and delete all your cookie data for Facebook.
To do this on chrome, go up to the three dots in the top right-hand corner, select “settings”, “Privacy & Security” on the far left, “Cookies & Other Site Data”, “See All Cookies & Site Data”, then search “Facebook”. Delete all their cookies.
Then log back into Facebook and click on an ad. In the URL you should be able to find the fbclid in the URL which you need to copy and paste.
Then go back to your Leadshook decision tree and click “Direct Link” and then click the button next to the link to pop out your quiz.
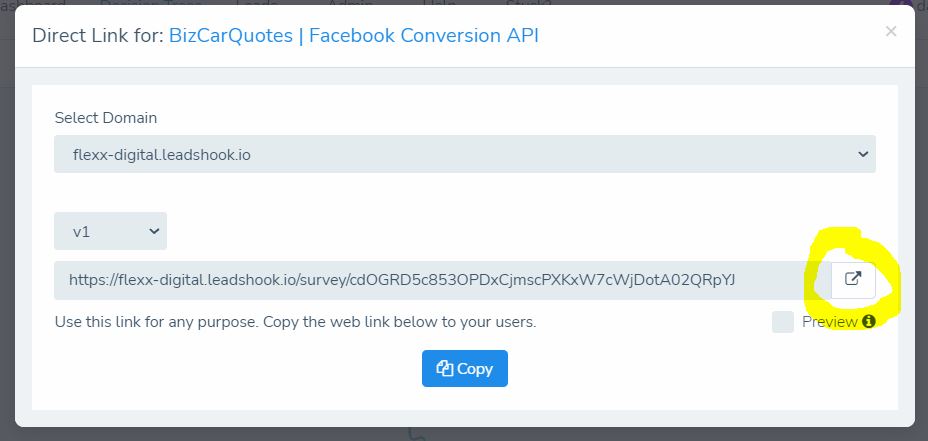
Ensure your URL looks like this with “?” in front of the fbclid like below.
This should give you the following data on your first node (Tap enter again if any information doesn’t appear):

Double-check everything looks good. Then go onto the next 2 nodes and input your contact details.
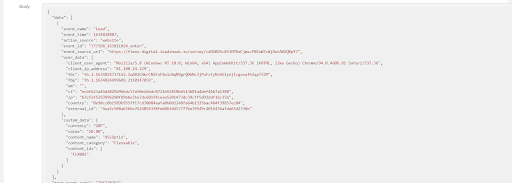
Then it will go into the next “data node” where you should check that everything is being populated. It should look something like this…
Then submit your lead if everything is pulling through correctly.
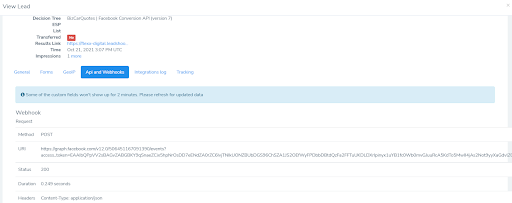
Then you want to go back to your Leadshook decision tree and select “Leads” in the menu bar and then “Leads” or “Leads V2”.
Select the lead you just send through and click on it. Then go to “API and Webhooks” and check if your post was successful.

Once it has gone through successfully, go into Facebooks “Event Manager” > “Data Courses” > Select your pixel > Click “Test Events”.
Not within test events, it should show something like this…

If all this has worked out correctly, then the Facebook Conversion API is working correctly!
Next, we need to set it to go live!
Firstly, you want to move the 7 scripts on the first node (Information Already Captured (see Node Level Scripts)) to the node below in your decision tree.
Once this is done, you can delete that first node, so the new first node is your first question and has the 7 scripts on.
Then you can delete the other data node (titled: “Display All Values Before Webhook to FB).
Then finally you want to delete the test section in the Facebook Conversion API ( “test_event_code”: “TEST28545”) and also delete the comma on the line above next to the square bracket (],)
Once all this has been done, I’d test again and check the “API and Webhook” section of the lead in Leadshook to check it was still a success.
Then you want to go back to “Events Manager” > “Data Sources” > Select Pixel and check whether the event has come in (Can take a while)…
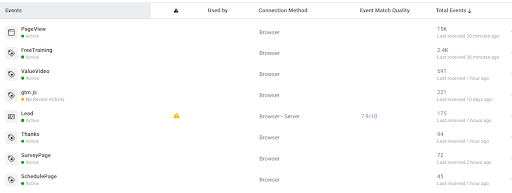
Leads should show up and it should say “Server” or “Browser – Server”.
While you wait for that, go to “Aggregated Event Measurement” > “Configure Web Events” > Click your verified domain > “Manage Events” > Then add your lead event in as highest priority…
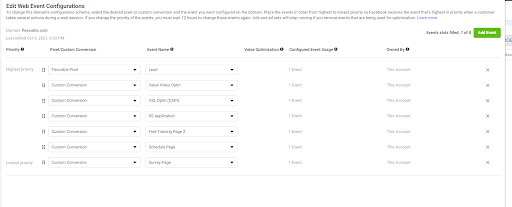
Then save and exit.
Bear in mind you can create a custom conversion based on this event if you so wish and optimise for that instead. Both do the same thing.
The Facebook Conversion API can be an absolute ballache to get set up, but the guys at Leadshook have really gone all out to make it as simple as possible, and I have found their information around the Facebook Conversion API extremely helpful!
Hopefully, this guide can help you get set up on Leadshook and I will be trialling the Facebook Conversion API on other software too and will create more guides in the future so keep your eyes peeled.
If you have any questions please feel free to comment below and we’ll get back to you.
Want access to our other tutorials?
Go check out our Flexxable YouTube channel…
All you need to grow your PPL lead gen agency