The Power Of Button Clicks
Clicks are an important metric when looking at your marketing performance.
We always track the cost per click when looking at the ad level, so why don’t we show the same respect to button clicks on our landing pages?
There’s a huge amount of information that could be gathered based on what and where people are clicking on our pages.
For example, we ran an advertorial and have events on each button click, at different stages of the page.
- The button above the fold
- The button in the middle
- The button at the bottom
From this, we created audiences based on which button they clicked.
People who clicked the third button, at the bottom of the page were a great quality audience as they had read through the advertorial and decided to click through to the next page.
This is also great for button clicks on PDF’s, downloadable content and clicks off-site.
So, here’s how to do it…
Generic Button Click Trigger in Google Tag Manager
Firstly we want to add a generic button click trigger, so we can track all clicks on the page.
(I am assuming you have already got GTM on your page. If not, follow these instructions)
Follow these simple steps to implement…
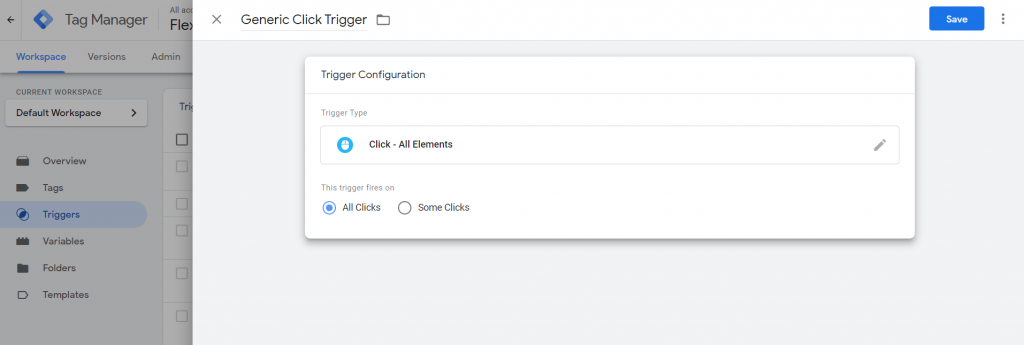
- On the workspace tab, on the left-hand menu, select “Triggers”.
- Click “New”.
- Select “Click – All Elements”.
- Select “All Clicks”
- You want to then save.
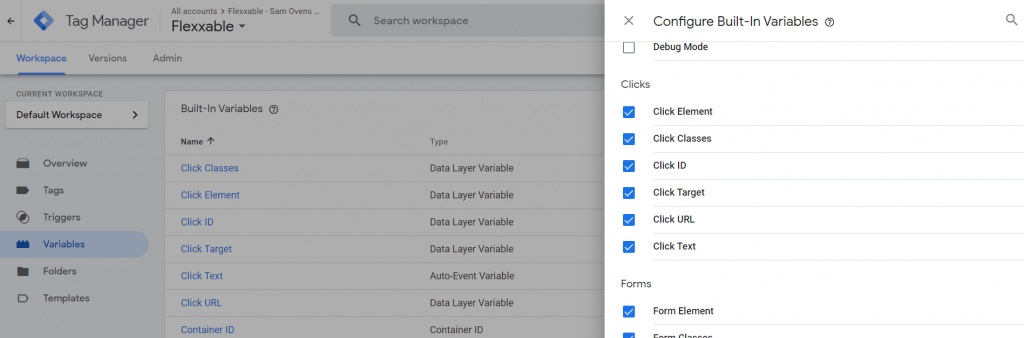
Ensure Click Variables Are In Place
Now we want to make sure we configure the correct variables in google tag manager, so our button click information shows up when we test.
We can do this by…
- Go to the variables tab in the left-hand menu.
- You want click “configure”.
- Then make sure you check all the click related variables.
Google Tag Manager in Debug Mode
So now we want to test some clicks on the page and see what the feedback into Google Tag Manager.
Follow these simple steps to test…
- Click “Submit” in the top right-hand corner and save your work.
- Click “Preview” next to submit to open the “Debug View”.
- Type your URL of the page you want to track button clicks on, into the popup window.
- Click “Connect”
- This will open your page in “Debug View” Start clicking on a few things, making sure you remember which order you did it.
- Then go back to the tab called “Tag Assistant [Connected]”.
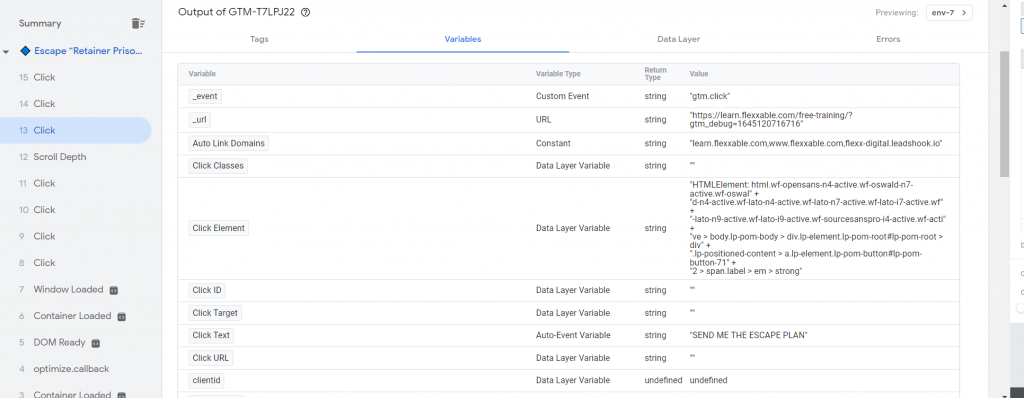
- Below is what you should see…
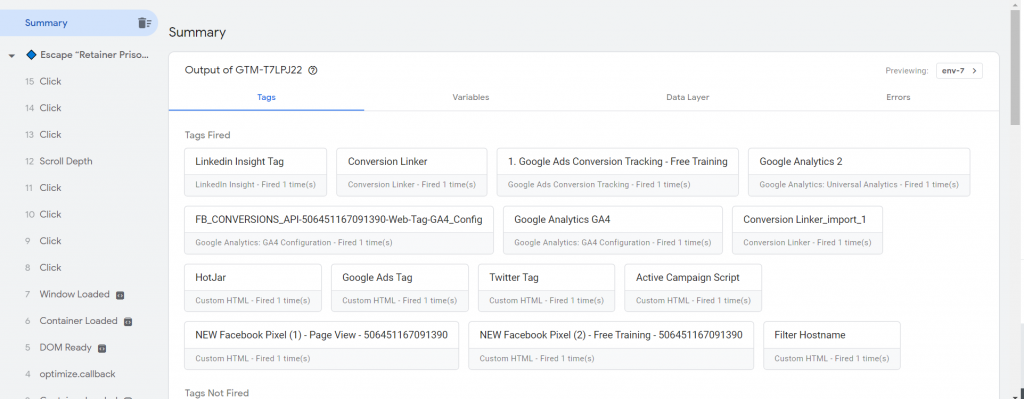

Now you want to check all these clicks and look at the variables.
- Click on one of the options in the land had bar that says “click”. There should be a few of them.
- Then you want to click on the “Variables” tab.
- Here you can see the unique identifiers of the click.
Setting Up Your Button Click Trigger
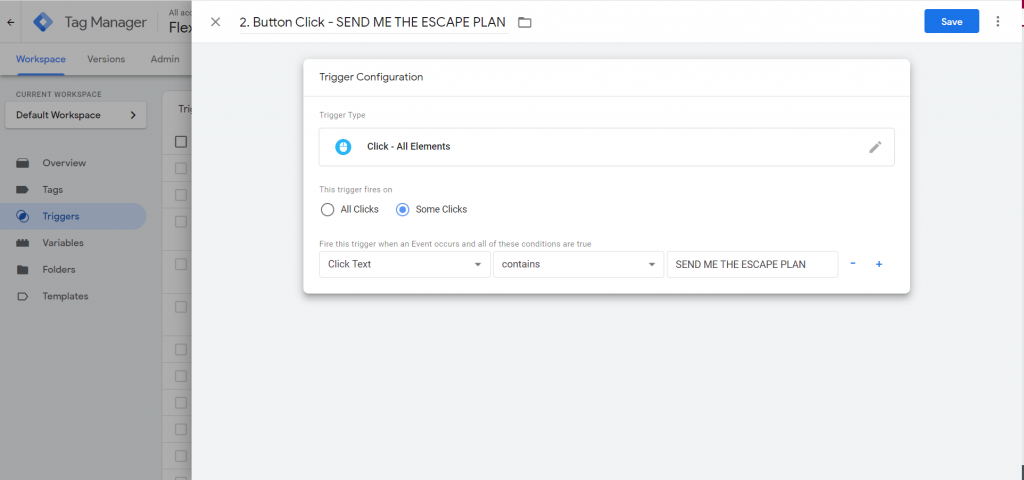
This is where you want to find what you want to trigger the click on.
I’ve decided I will trigger my click on the “Click Text” variable as that was the most unique variable I had available.
So to set up your Button Click trigger you need to…
- Come out of “debug mode” and back to Google Tag Manager.
- Go back to triggers.
- Click “New”.
- Click Trigger configuration and select “Click – All Elements”.
- Select “Some Clicks”
- Select “Click Text” from the drop-down menu (Or which ever variable you’ve chosen).
- Select “Contains”
- Then the text that showed in the debug view. Ours was “SEND ME THE ESCAPE PLAN”
Setting Up Your Tag
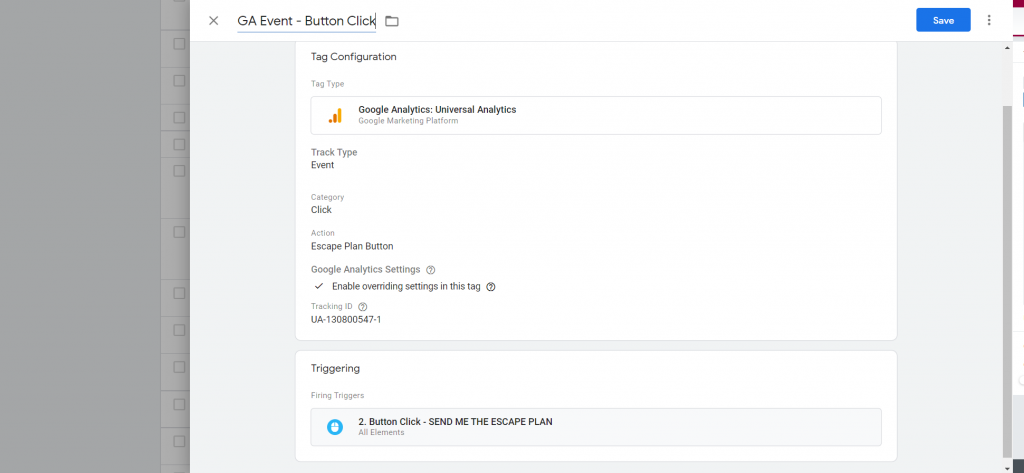
Now the trigger is set up, you want to add a tag to it, to ensure that everything is working well.
We always start with a google analytics event.
(Again, we assume you already have Google Analytics set up. If not follow this…)
- Click on “Tags” in the left-hand menu.
- Select “New”.
- Click “Tag Configuration” and select “Google Analytics: Universal Analytics”
- Change “Track Type” to “Event”
- Add a category, (we put “Click”).
- Then add an Action, (we put Escape Plan Button).
- Then scroll down and at the bottom click “Enable overriding settings in this tag”.
- In Tracking ID add your universal tracking number, it should look like UA-*********-1.
- You can find this by going to Google Analytics and clicking “Admin -> Tracking Info -> Tracking Code”>.
- Then click on “Triggering” and select the trigger that you just created.
- Click Save and name it.
Testing Everything Works with Your Button Click
Now to check everything works…
- Click “Submit” and save all your changes.
- Select “Preview” to re-enter debug mode.
- Click “Connect” (your URL should still be there from last time).
- Once your page has loaded click on the button you want to track.
- Go to the tab “Tag Assistant [Connected].
- On the left-hand side click the “Click” option. There should only be one if you clicked once.
- Under “Tags” there should be your tag that fired. Click it.
- Under firing triggers, it should have ticks against the filters you set up.
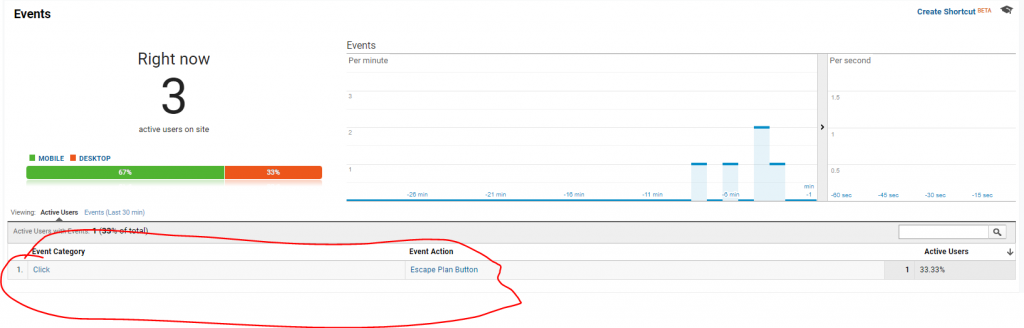
- Then go into your Google Analytics account. Go to “Real-Time” and then to “Events” and check it showed up.
- It should look something like the image below…
- Then you should all be set up to fire other tags off this button clicks and create more button click triggers.
Sick of being a “Master Of None” and a slave to your ‘whale’ clients?
I would fire a pain-in-the-butt $2,000 a month retainer client for Pay Per Lead PARTNERS that make $3,000 profit a DAY every day of the week.
In fact, I fired them ALL!
Would you?
Then get our “Retainer Prison” escape plan.
It’s free.