The Facebook Conversion API & Go High Level
With the introduction of iOS 14, the Facebook Conversion API with Go High Level has become a must-have!
Before you could have gotten away with just having browser events for your tracking, but iOS 14 has dropped a huge proverbial dump on the accuracy of this tracking method.
Why?
Because Apple is hiding the cookie data of those who opt-out of tracking on iPhones which means the Facebook Pixel will not know if they convert or not.
So our students and I have seen huge discrepancies in the number of conversions we are seeing.
The Facebook Conversion API can really help with this because:
- Events are only sent to FB once they convert (Server-Side Events)
- These are much more accurate than browser events
- Works with browser events to ensure the best accuracy possible
Therefore we have created a definitive guide to setting up the Facebook Conversion API, so you can implement it easily in your agency WITHOUT the need for a developer.
We use an appointment setting software called Go High Level, and they have created an extremely easy way to set up your Facebook Conversion API.
So let’s get into it…
First things first…
What to do inside Facebook?
You first need to get all the information you will need to create the webflow within Go High Level
- Pixel ID
- API Token
- Name of conversion
To find these –
- Pixel ID – Go to “Business Settings” > “Data sources” > “Pixels” > Select your pixel > Click on the “ID” to copy to clipboard > Add to your notepad.
- API Token – Go to “Events Manager” > “Data Sources” > Select your pixel > Click “Settings” > Scroll down to “Conversions API” > Click “Generate Access Token” > Copy and save to your note pad.

- We are going to trigger this on appointments, so we will be using the “Schedule” event.
The Go High Level Facebook Conversion API is relatively simple compared to others *sigh of relief* so I will take you through how to set it up.
Setting up the Conversion API inside Go High Level
So, obviously, first, you will need a Go High Level account to be able to utilise this. If you don’t have one you can create one by clicking here.
Once you are in the account let’s get at it!!!!
- Log into your Go High Level Account.
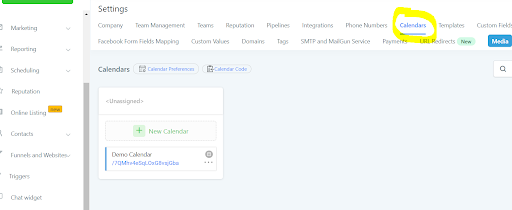
- Go to your calendar (or create a calendar if you don’t have one) which can be found inside your “client view” and in settings and then “Calendars”
- Ensure you have the FB Pixel ID on the “3. Confirmation” stage.
- Then in “settings” again, go to integrations and link your Facebook page to your client account. Once it’s been loaded ensure you connect the Go High Level account to the correct ad account.
- Then head over to the “Workflows” tab.
- Click the “+ Create Workflow” button, then select “Start from scratch” and then click “+ Create Workflow” again.
- Then name your workflow “Facebook Conversion API – Appointment”. Then click on “Add New Workflow Trigger” and the Workflow Trigger Type should be “CRM” and then the Workflow Trigger should be “Customer booked appointment”.
- ENSURE you don’t select just the “Appointment” option as this doesn’t work for some reason
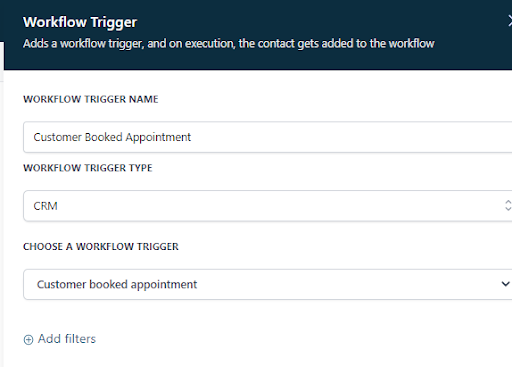
- Press save.
- Then click the (+) below the trigger.
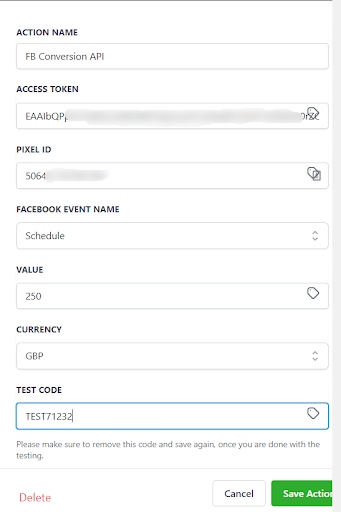
- Select “Facebook – Conversion API”.
- Then go to your notepad and add in your “Access Token” and “Pixel ID”
- Add the Facebook event you want to trigger, which we set as “Schedule” and add in your value and currency.
- Then finally add in your Test Code…
- Then you need to go and test the Facebook Conversion API is working correctly.
- To do this go back to the “settings” area and then click “Calendars”.
- Click the link of your calendar and it will open a new tab with your booking page.
- Then open up your Facebook and click on the first ad you see. Take the “fbclid” in the URL string from that landing page and add it onto your calendar URL with a “?” before it.
- Then press “Enter” to refresh the page.
- Then select a date and fill out your form.
- Once done, go back to Go High Level and go to “Webflow” and click the number below “Total Enrolments”.

- Then click on “execution log” and ensure it’s been executed.

- You can see what data has been sent by clicking on “FB Conversion API” and then “User Data Sent To Facebook”.
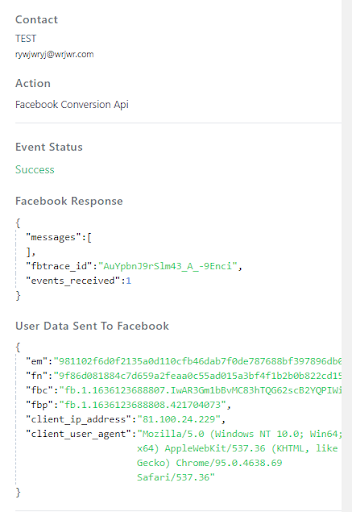
- Then go to your events manager again and check to see if the lead has come into Test events.
- If it has, the Facebook Conversion API is working and you are good to go! Take out the Test Code and set it live.
Want access to our other tutorials?
Go check out our Flexxable YouTube channel…
All you need to grow your PPL lead gen agency